 |
|
|
Using the bvh.py file in Blender
|
|
| Just give me the .blend files |
|
|
USING THE BVH.PY FILE IN BLENDER
First off... let's give credit where credit is due... "Let's give a big loud applause for Reevan McKay" . None of this would be possible without his Python script. Thanks Reevan! I basically have (3) different files for download. The BVH Python script by itself: bvh.zip A .blend file that has the BVH Python script in it, with a sample .bvh file and a default skeleton setup with empties: default.zip And finally, the above .blend file that has the script applied to it. So all you have to do is hit ALT+A in the 3d window: default_done.zip Note: None of the .blend files have any modelling in them. That has been left up to you. They do however have a complete skeletal system with parented empties so you can play around with attaching your own "skin". Also... This script has been tested with Python 2.01 and Blender 2.20 without any problems. If you download the script by itself, you can IMPORT the script in any .blend file by opening up the TEXT WINDOW in Blender and clicking ALT+SHIFT+F at the same time and clicking on OPEN. Once you open the bvh.py file, just click ALT+P in the same window to run it. You will need to follow Reevan's directions for making an EMPTY skeleton system from scratch, or just use the one in the default.zip file If you download the default.zip file, you will NOT have to worry about completely setting up the empties, this has already been done for you. You will have to run the script by clicking ALT+P in the text window. The screen will then look like this: 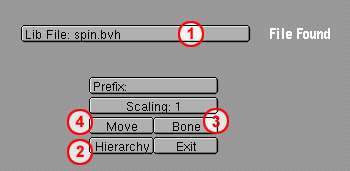 Number 1: Library File Path. Change this to the name of the .bvh file. Use the absolute path to the file. Another words, if you saved the .bvh file in the same directory as the .blend file, you'll only need to use the name of the .bvh file. Number 2: Use the Hierachy button to read the contents of your .bvh file. An html document will be produced in the same directory as the .bvh file. This html document will have a list of all the names used for the skeleton setup in the .bvh file. Make sure you rename your empties used in your file the same exact name. And yes, they are CASE SENSITIVE! This has already been done for you in the default.zip file. Number 3: The bone button will align your empties to the scripts neutral position. There is NO PROGRESS BAR IN BLENDER, so the trick I learned is to hold your mouse over any other button and you will see it change color when the task has completed. Number 4: The move button will align your empties to the scripts location by applying IPO information for each one. Again, there is NO PROGRESS BAR IN BLENDER. Once this has completed you can click on the exit button. Now all you need to do is move your mouse in the 3d window and hit ALT+A to watch your empties/skeleton animate. If you download the default_done.zip file, you will NOT have to anything but hit ALT+A in the 3d window: Click on the file to download: bvh.zip default.zip default_done.zip Well that's about all there is to using the script. Now find out how to make your own .bvh files in the next step... |